
This following report details how our keyrings should be tested correctly. The aim of the testing in this instance it to ensure that the toy part of your product does not come away from the ribbon or chained yarn and complies with the requirements of EN71-1 testing procedures.
Background
A customer asking for clarification and guidance to undertake testing on our products as the way they tested produced a fail. We take product safety seriously and we vigorously test to make sure they are safe to use. The keyrings will not produce a failure in testing if they are correctly managed.

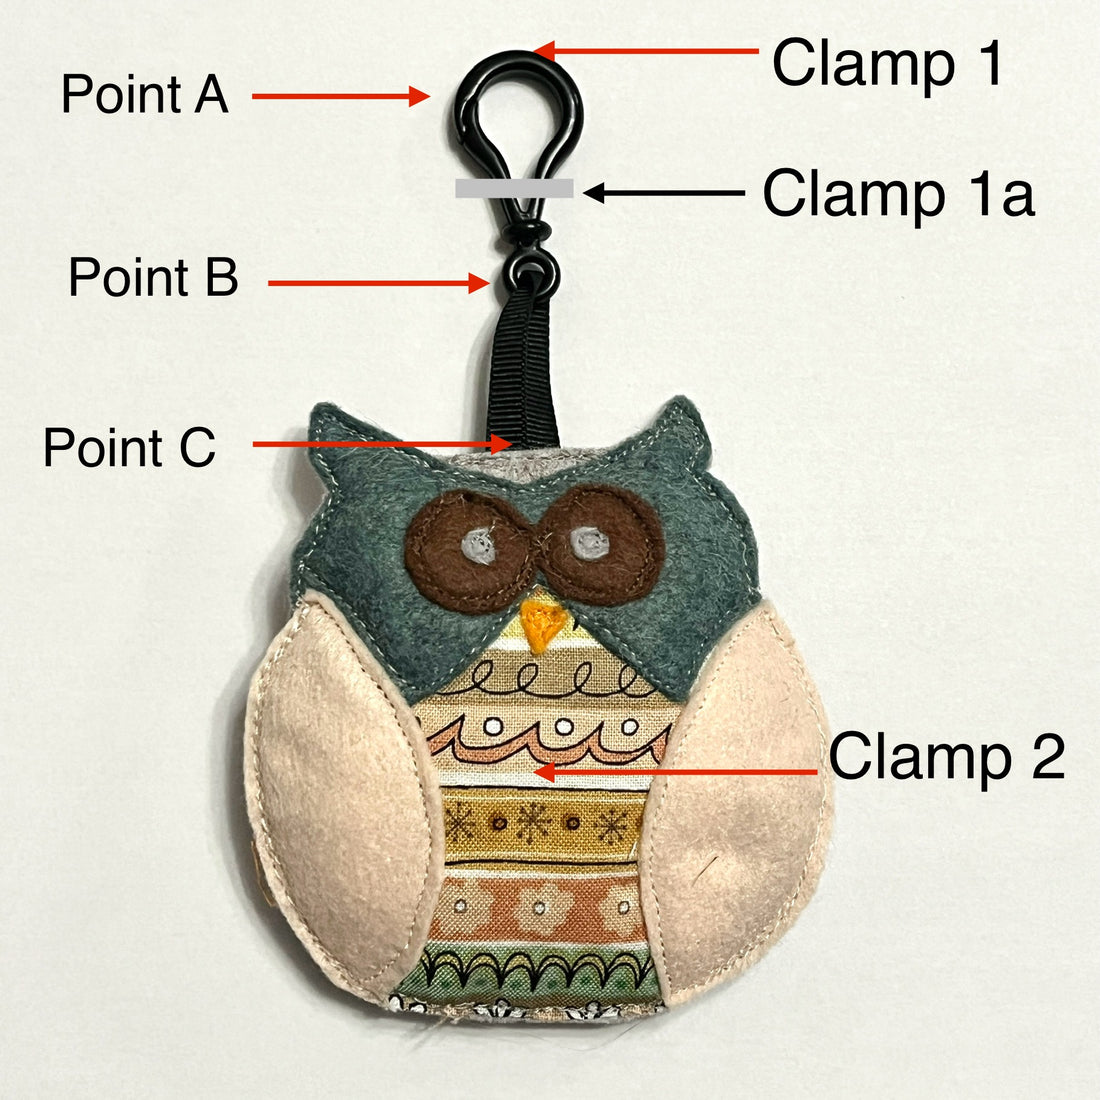
They had placed the clamps to complete the tension tests in accordance with EN71-1 (Mechanical and Physical Tests) at Clamp 1 and Clamp 2 positions. When the weight was applied the keyring failed at 6Kg when it has to stand up to 7.2Kg. The fail was at Point A which is the point at which the keyring is designed to be attached to other things such as a backpack. By the very design this would be the weak point of the product as it would break away from what it was attached to, thus saving the child from potential injury. Think of it in the same way as the breakaway clip on a lanyard around your neck, although not strictly designed for that it works in a similar manner.
In fact, that test was actually testing three points A, B and C together but you need to look objectively and isolate the area of concern, which is to stop the keyring becoming detached from the soft toy. In this case it is Point C where the ribbon is sewn into the soft toy that securely holds the keyring. This is the position that should be isolated and tested to make sure that it is strong enough to withstand being used.
Testing Point C
To isolate Point C and test it Clamp 1 needs to be positioned at Clamp 1a position. This will remove Point A from the test. Both clamps should be equal distance from Point C which is being tested. The clamp should be attached to the keyring as shown in the photograph below.
As an integral part of the keyring Point B by design will withstand the test and Point C will be the weak point; however, if you wish it is possible to test Point C by attached the clamp at Clamp 1a position to the ribbon (between Point B & C) those eliminating Point B altogether. This will then give you a true and accurate assessment of your toy and its construction.

So did it fail the EN71-1 Test?
Simple answer is no. The keyring did exactly what it is supposed to do and didn’t snap producing small parts. All that happened was the part that is meant to open opened as it should.
When you are undertaking any tests before you start think
- What am I trying to achieve?
- What is the best way to isolate and test that part?
- Have you checked for any other potential issues?
I would like to say thank you for bringing this to our attention so that we can reassure you that we take these matters seriously. If you have any issues, please feel free to contact us.
If you would like a copy of this for your technical file just click on the link below for a PDF file
Thank You
Paul